🎯 Hey there! If you’re new to Linux or just brushing up on RHEL fundamentals, this guide is for you. We’ll break everything down step by step, with plenty of theory, examples, and tips to make it all click. No prior experience needed – let’s make Linux fun and approachable!

Table of Contents
Open Table of Contents
- 📂 Understanding the Linux File System
- 🔗 Soft Links & Hard Links: What They Are and Why They Matter
- 🔒 File Permissions & Ownership: Controlling Access Like a Pro
- 🔐 Advanced Permissions & ACL: Taking Security to the Next Level
- 💾 Linux Filesystem & Storage Commands: Managing Your Data
- 🗜️ Compression, Archiving, and Combining Both: Saving Space Smartly
- 💾 Rsync for Backups: Your Reliable Copy Tool
- 📊 Process Status (ps) & System Monitoring: Keeping an Eye on Your System
- 🧭 What’s Next?
📂 Understanding the Linux File System
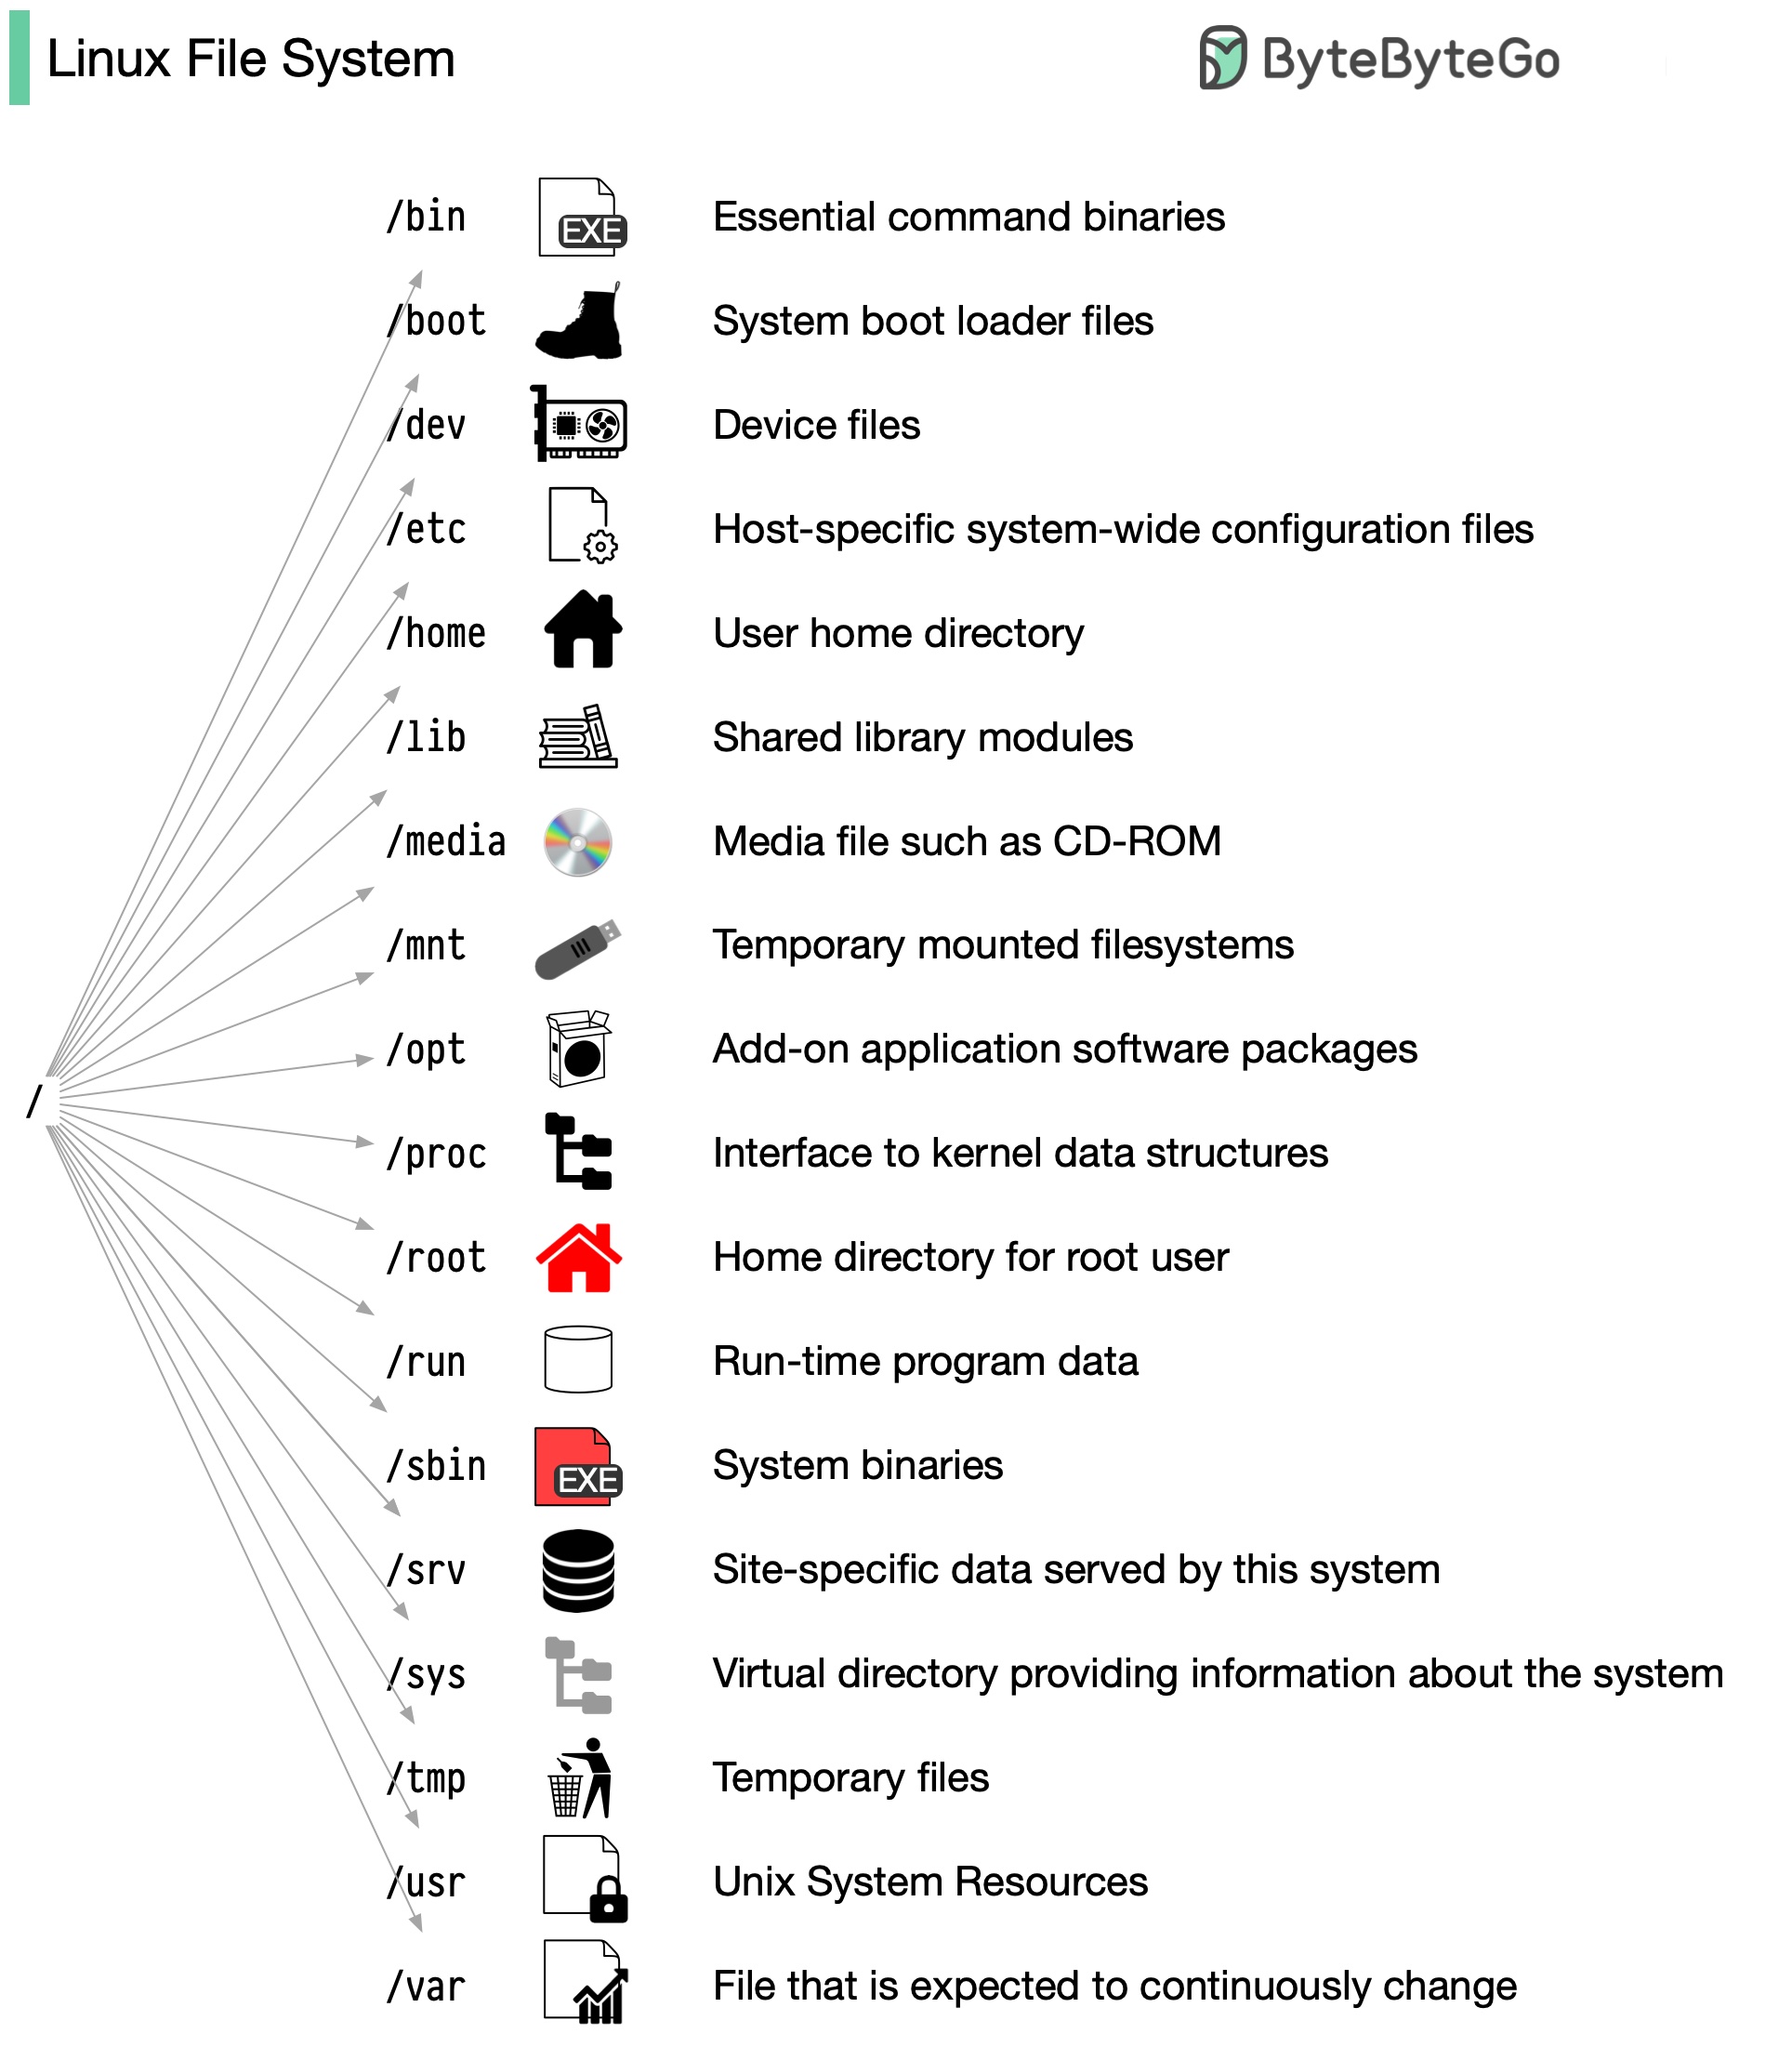
Imagine your computer’s storage as a big family tree – that’s basically the Linux file system! It starts at the very top with the root directory, written as /. Everything else branches out from there, like folders inside folders. This structure keeps things organized and helps the system find files quickly.
Why is this important? In Linux (and RHEL, which is a popular version of Linux used in businesses), knowing where files live makes troubleshooting and managing your system way easier. For beginners, think of it like navigating a house: the kitchen (/home) is where you keep personal stuff, the basement (/etc) has all the setup tools, and so on.
Here are some key directories explained simply:
-
/home: This is your personal space! It holds user files, like documents and settings. For example, if your username is “alex,” your stuff is in/home/alex. -
/bin: Short for “binaries.” This has essential commands you use every day, likels(to list files) orcp(to copy things). These are the tools that make Linux work. -
/etc: Configuration central! System settings live here, like network setups or user passwords. Be careful editing these – they’re like the blueprint for your system. -
/var: Variable data, such as logs (records of what your system does) and temporary files that change often. -
/tmp: Temporary files go here. They’re like sticky notes – useful for a bit, but they get wiped when you reboot. -
/usr: User-installed programs and libraries. Think of it as the app store for your system. -
/dev: Devices! This treats hardware like files – e.g.,/dev/sdamight be your hard drive. -
/mnt: Where you “mount” external drives, like plugging in a USB stick.
Every file and folder also has permissions, which we’ll dive into soon. They decide who can read, change, or run things. This setup makes Linux secure and efficient, unlike Windows where things might feel more scattered.
Beginner Tip: Use the tree command (install it if needed with sudo yum install tree on RHEL) to visualize the structure: tree / (but be ready, it’s a big tree!).
🔗 Soft Links & Hard Links: What They Are and Why They Matter
Links in Linux are like shortcuts or aliases for files, but they come in two flavors: hard and soft (symbolic). Why use them? They save space, organize files without duplicating data, and make it easier to access stuff from different places. Think of them as pointers – hard links are like extra names for the same file, while soft links are like bookmarks.
Hard Link: The Direct Twin
A hard link points straight to the file’s data on the disk. If you delete the original, the hard link still works because it’s essentially the same file with multiple names.
- Pros: Super reliable; no broken links if the original moves or deletes (as long as one link remains).
- Cons: Can’t link to directories, and it only works on the same filesystem (like the same hard drive partition).
Theory Bit: In Linux, files are identified by inodes (unique numbers). Hard links share the same inode, so they’re equals.
Example for Beginners:
echo "Hello World" > original.txt  # Create a file
ln original.txt hardlink.txt       # Make a hard link
cat hardlink.txt                   # Outputs "Hello World"
rm original.txt                    # Delete original
cat hardlink.txt                   # Still works!
Soft Link (Symbolic Link): The Flexible Shortcut
A soft link points to the file’s path, like a desktop shortcut. If the original moves or deletes, the link breaks (dangling link).
- Pros: Can link to anything – files, directories, even across different drives.
- Cons: Breaks easily if the target changes.
Theory Bit: Soft links have their own inode and just store the path to the target.
Example:
ln -s original.txt softlink.txt    # -s for symbolic
rm original.txt                    # Now softlink.txt is broken
Helpful Tip: Use soft links for convenience, like linking a config file to an easy spot. Hard links? Great for backups where you want data to survive deletions.
🔒 File Permissions & Ownership: Controlling Access Like a Pro
Permissions are Linux’s way of saying, “Who can do what to this file?” It’s a security feature to prevent accidents or unauthorized changes. Every file has an owner (usually who created it), a group (for sharing with teams), and “others” (everyone else).
Ownership Basics
- User/Owner: You, the creator. Full control by default.
- Group: Like a club – multiple users can share access.
- Others: The public; limited access.
To see ownership: ls -l file.txt shows something like rw-r--r-- 1 alex users ... file.txt (alex owns it, group is users).
Permissions Explained (RWX)
Permissions are in threes: read (r), write (w), execute (x). No permission? It’s a dash (-).
- Read (r): Open and view the file.
- Write (w): Edit or delete it.
- Execute (x): Run it as a program or enter if it’s a directory.
For directories: r = list contents, w = create/delete inside, x = enter the folder.
Example Breakdown:
drwxr-xr-- # d = directory, rwx for owner, r-x for group, r-- for othersChanging Things
- Ownership:
chown alex:users file.txt(change to user alex, group users). - Permissions: Use numbers (octal) or letters.
Octal System (Easy Math): Each set (owner/group/others) is a number from 0-7:
- r=4, w=2, x=1. Add them up: rwx=7, r-x=5, etc.
Table for Clarity:
| Permission | Binary | Decimal | What It Means |
|---|---|---|---|
| --- | 000 | 0 | No access at all |
| —x | 001 | 1 | Can execute/run |
| -w- | 010 | 2 | Can write/edit |
| -wx | 011 | 3 | Write and execute |
| r— | 100 | 4 | Can read/view |
| r-x | 101 | 5 | Read and execute (common for scripts) |
| rw- | 110 | 6 | Read and write |
| rwx | 111 | 7 | Full access |
Example: chmod 754 file.txt = Owner full (7), group read/execute (5), others read (4).
Letter Way (More Intuitive for Beginners):
chmod u+rwx file.txt  # u=user/owner, +add rwx
chmod g-r file.txt    # g=group, -remove read
chmod o= file.txt     # o=others, =set to nothing
chmod a+x file.txt    # a=all, +execute for everyone
Beginner Advice: Start with ls -l to check, then chmod. Always test on non-critical files! If you’re root (admin), you can override, but that’s risky.
🔐 Advanced Permissions & ACL: Taking Security to the Next Level
Standard permissions are great, but sometimes you need more control. Enter chattr for file attributes and ACL (Access Control Lists) for fine-tuned access.
chattr: Extra Protection Layers
This adds flags that even root can’t ignore easily. It’s like locking a file in a safe.
Why Use It? Protect important files from accidental deletes or changes, especially in servers.
Key Attributes:
| Attribute | What It Does | Use Case |
|---|---|---|
| +i | Immutable: Can’t delete, rename, or edit | Lock config files |
| +a | Append-only: Add data but no edits | Secure logs |
| +u | Undeletable: Recover after delete | Safety net for data |
| +s | Secure delete: Wipes data on delete | Privacy |
| +d | No backup: Skip in dumps | Temp files |
Examples:
sudo chattr +i config.txt(now untouchable)- Remove:
sudo chattr -i config.txt - Check:
lsattr config.txt
Theory: These are extended attributes stored in the filesystem, beyond basic perms.
ACL with setfacl: Share with Specific People
ACL lets you give permissions to extra users/groups without changing ownership.
Why? In teams, one file might need different access for different people.
Basics:
- View:
getfacl file.txt - Set:
setfacl -m u:john:rw file.txt(john gets read/write)
More Examples:
- Group execute:
setfacl -m g:team:x script.sh - Remove:
setfacl -x u:john file.txt - Defaults for folders:
setfacl -m d:u:alice:rwx folder/(new files inherit)
Tip for Newbies: ACL builds on chmod – use when basic perms aren’t enough. Install acl package if needed: sudo yum install acl.
💾 Linux Filesystem & Storage Commands: Managing Your Data
Storage in Linux is about partitions (slicing your drive), filesystems (formatting them), and mounting (attaching them). It’s like organizing a closet: divide spaces, label them, and hang things up.
Theory Overview: Disks are raw hardware (/dev/sda). You partition them, format with a filesystem (ext4 is common in RHEL for reliability), then mount to use.
Partitioning: Dividing Your Disk
Tools like fdisk (old-school for MBR) or parted/gdisk (for modern GPT).
fdisk /dev/sda: n=new partition, d=delete, p=print, w=save.- After changes:
partx -a /dev/sdato tell the system.
Beginner Caution: Backup first! Wrong commands can erase data.
Formatting: Creating Filesystems
mkfs.ext4 /dev/sda1: Makes ext4 (fast, journaled for crash recovery).- Others: xfs (high-performance), vfat (for USBs), mkswap (for virtual memory).
Why ext4? It’s RHEL’s default – handles big files, recovers well.
Mounting: Attaching Storage
mount /dev/sda1 /mnt/data: Now usable at /mnt/data.- Unmount:
umount /mnt/data. - Check:
df -h(usage),du -sh folder/(size),lsblk(overview),blkid(UUIDs).
Checking & Fixing
fsck -y /dev/sda1: Scans and repairs (unmount first!).- Resize:
resize2fs /dev/sda1 20G. - Bad blocks:
badblocks -v /dev/sda(checks hardware issues). - Repair:
e2fsck -yc /dev/sda.
LVM: Flexible Volumes
LVM lets you resize storage on the fly – great for servers.
Steps:
pvcreate /dev/sda1(physical volume).vgcreate myvg /dev/sda1(volume group).lvcreate -L 10G -n mylv myvg(logical volume).- Format and mount.
Why LVM? Add/remove disks without downtime.
Swap: Extra Memory
mkswap /dev/sda2,swapon /dev/sda2.- Check:
free -h.
Persistent Mounts with /etc/fstab
This file auto-mounts on boot. Format: device mount-point type options dump fsck.
Example:
UUID=abc-123 /mnt/data ext4 defaults 0 2- Get UUID:
blkid. - Test:
mount -a(after edits).
Pro Tip: Always backup /etc/fstab – mistakes can make your system unbootable!
🗜️ Compression, Archiving, and Combining Both: Saving Space Smartly
Compression shrinks files (like zipping clothes in a suitcase), archiving bundles them (like packing a bag). Together, they’re perfect for backups or sharing.
Theory: Compression removes redundancy (e.g., repeating patterns). Archiving doesn’t compress but combines for easy handling.
Just Compression
gzip file.txt→ file.txt.gz (fast, common).bzip2 file.txt→ better compression, slower.xz file.txt→ best squeeze, but takes time.- Decompress: gunzip, bunzip2, unxz.
Tip: Use for logs or text – images/videos are already compressed.
Archiving with tar
- Create:
tar -cf archive.tar files/(c=create, f=file). - Extract:
tar -xf archive.tar. - View:
tar -tvf archive.tar.
Combo: Archive + Compress
tar -czf archive.tar.gz folder/(z=gzip).- Extract:
tar -xzf. - Alternatives: -j for bzip2, -J for xz.
- Read without extract:
bzcat archive.tar.gz.
Why tar.gz? Standard in Linux, portable.
ZIP: Windows-Friendly Alternative
- Add:
zip -u archive.zip newfile.txt. - Extract one:
unzip archive.zip file.txt. - Compress max:
zip -9. - Password:
zip -e secure.zip file.txt.
Beginner Hack: For big folders, compress first, then move. Saves time!
💾 Rsync for Backups: Your Reliable Copy Tool
Rsync is like a smart copier – it only transfers changes, making backups fast and efficient. Great for local or remote syncing.
Theory: It compares files by checksums, not just dates, so it’s accurate.
Basic:
rsync -av source/ dest/ # a=archive (keeps perms), v=verboseExamples:
- Folder backup:
rsync -arv /home/docs/ /backup/(r=recursive for folders). - With tar: Tar first, then rsync the .tar.gz.
- With zip: Same idea.
- Remote:
rsync -av /local/ user@server:/remote/.
Helpful Flags: -z for compression during transfer, —delete to mirror deletes.
Tip for Starters: Test with —dry-run to preview changes. Perfect for daily backups!
📊 Process Status (ps) & System Monitoring: Keeping an Eye on Your System
Processes are running programs. Monitoring them helps spot issues like high CPU use.
ps Basics: ps shows snapshots.
Useful Flags Table:
| Flag | What It Does | Example Use |
|---|---|---|
| -A/-e | All processes | See everything running |
| -u | User-specific | ps -u alex for your stuff |
| -x | No-terminal processes | Background daemons |
| -l | Detailed info | Long format |
| -f | Full details | With commands |
| —forest | Tree view | See parent-child |
More Tools:
top/htop: Live view (htop is colorful, easier).sar: Historical stats.iostat: Disk/CPU load.vmstat: Memory/swap.iometer: Benchmark disks.
Process Hunting:
- PID:
pidof apporpgrep -l ssh. - Kill:
kill -9 PID(force quit),pkill app. - Tree:
pstree. - Open files:
lsof -i :80(port 80 users). - USB:
lsusb. - CPU:
lscpu.
Danger Zone: Fork Bomb
:() { :|:& }; : – This spawns endless processes, crashing your system. It’s a demo of recursion gone wrong – don’t run it!
Beginner Strategy: Start with top to watch live, then ps for details. If something’s hogging resources, kill it safely.
🧭 What’s Next?
You’ve got the basics down! Practice on a virtual machine (try VirtualBox with RHEL ISO). Next, explore networking or scripting. If something confuses you, man pages (man command) are your friend. Keep experimenting – Linux gets easier with hands-on play. Questions? Drop a comment!